Introduction
I have finally revived the popular racetrack tutorial I wrote in 2006, as featured on Blender Nation. This tutorial was originally written for 2.40, and I have updated it for 2.49. Sometime in the future I will port it to 2.5x.
You can download the end result here:
DanielSefton.com – Racetrack Tutorial Files.zip
In this huge tutorial you will learn how to model, texture, light, and test a low poly racetrack. I have tried my best to explain everything in as much detail as possible, but I would advise that if you are new to Blender that you brush up on the basics so that you have a good grounding ready for the more complex methods and features discussed in this tutorial.
Preparations
Designing the track
Obviously before we get going, we need to make preparations. To start you need to think about the design of your track, and create a reference image to work from. The following track design is the one I will be using for this tutorial; if you use it or not is up to you, although it would be nice if you could work with your own. You can easily follow from another design.
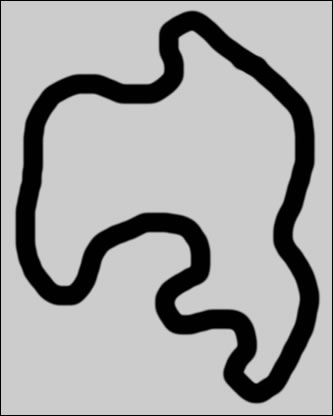
As you can see the design is fairly basic, but it contains just enough curves for good practice with the bezier tool, which will be explained in the next part of this tutorial.
Importing the design
Once you have your design ready and saved as an image on your computer, we need to import it into Blender. Open the program and delete the default setup. We want the image to display in the background, so, select ‘View’ in the 3D window toolbar and click on ‘Background Image’. You will see a small box pop up. Activate the ‘Use Background Image’ button. It should now look like this:

If you are wondering what the various settings are: ‘Blend’ applies transparency to the image, for blending it into the background, ‘Size’ defines the size of the image, and the X/Y offsets are used to position the image.
Next, click the small folder icon to the right of the ‘Image’ text. You will then see the ‘open dialog box’. Find the location of the image you want to use and then press the ‘Select Image’ button in the top right. The image should now appear in the background. Then click the ‘X’ to close the box so that it doesn’t get in the way. Note that image backgrounds only display in a fixed, orthographic view, not in perspective, and only in predefined views such as ‘top’, ‘front’ etc.
Modeling The Track – Part 1
Adding curves
To start off, we need to add a bezier curve. Bring up the main menu by pressing ‘SPACE’ and select ‘Add > Curve > Bezier Curve’. You will notice a curved line appear in the 3D view. Now, move it to a part on the outside of the track so you can begin to ‘trace’ around it.
To adjust the curve simply move the different vertices around (The small dot handles) by right clicking on them and pressing the G key or drawing a movement line. The vertex in the center of the three at each point moves the curve and the two on the outside rotates it.
You can also perform all the other basic transformations like size (‘S’ key) and rotation (‘R’ key). To accurately select the vertices, press the ‘B’ key once for box select and the ‘B’ key once again for circle selection. The latter gives you more control over selection. Use your scroll wheel or +/- to increase/decrease the size of the circle and press ‘ESC’ to exit it.
Tracing the track
Now that you are familiar with how to transform the curve, begin to trace around the outside of the track with the curve. You can add another joint by either selecting the center vertex on one of the sides, holding ‘SHIFT’ and again right clicking on the center vertex or by pressing ‘E’ to extrude it. You can disable the transformation widget if it gets in the way by deselecting the hand button in the 3D window toolbar. It should look start to look something like this:
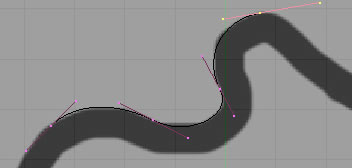
Transforming the curves can be tricky – just keep practising and you will get the hang of it eventually.
When you’re happy, carry on adding curves all the way around the track. Once finished you’ll probably be thinking “is there a way to join them up?” well, yes there is. If you press ‘C’ it will join the two ends of the curves together. However, I suggest that you don’t do this because it will prove to be a problem when it comes to editing the mesh. You can easily join it up manually after converting the curves. By now it should look something like this:

Adding depth
Now that we have traced the outline of the track, we can start to add depth. So, exit edit mode (‘TAB’) and add another bezier curve (‘SPACE’ > Add > Curve > Bezier Curve). This curve profile is what we are going to use to extrude around the track to form the road. So that we don’t end up with a wonky mesh, we need to straighten the curve. You can do this by pressing ‘V’. Depending on what you want your track to be like, you can add more curve joints. This will add another mesh column to your track so you can add things like a track side, barriers and rumble strips. For my track, I am going to add just two extra joints for the inner landmass and the outer landmass. You’ll need to think about this carefully, because if you decide to add barriers and rumble strips later on, it won’t be an easy task. My curve now looks like this:

Next, to extrude the curve around the track we need to associate a name with it. Exit edit mode (‘TAB’) and go into the ‘editing’ buttons. In The OB field in the far left box, enter a name (I usually call mine ‘cur’). Then, select the track curve and again in the editing buttons panel, in the far right box, enter the name you just called your extrusion curve into the BevOB field. If you now enter wireframe mode (‘Z’) you will notice that it looks something like this:
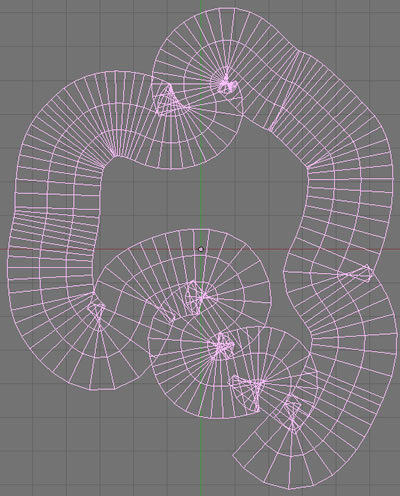
Looks a bit of a mess, doesn’t it? To sort out the overlapping all we need to do is increase the size of the track curve. Enter edit mode (‘TAB’) and press ‘A’ to select all the vertices, then increase the size with ‘S’. You can also fiddle about with the ‘Width’ property in the ‘Curve and Surface’ box which acts in a similar manner. When you then exit edit mode from the first method you will notice that the track looks a lot cleaner, as shown here:
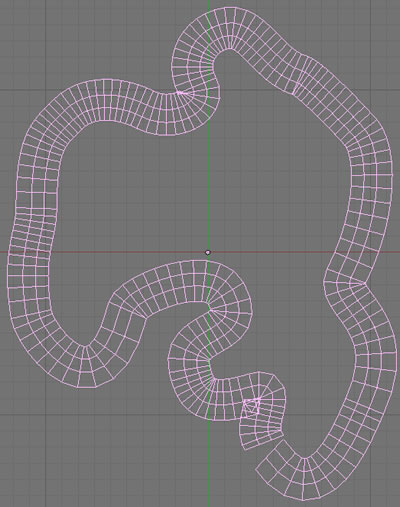
Unfortunately, the track is now way too thin. Just have a play about with the track profile curve until you have it at an appropriate width. Don’t worry if it slightly overlaps at places, we can sort that out when we convert it to a mesh.
The amount of polygons (faces) in the track looks slightly high. Reducing the number will not only help the game performance but it will also make it much easier to close up the mesh later on. Because the track is still in curve mode we can control and adjust it however we want.
In the ‘Curves and Surfaces’ box there is a grey field that says ‘DefResolU:’. At the moment, it is set to 12, so if we reduce that number right down to about 6-8, you will see it automatically reduces the amount of overall polygons. You may also notice that it has reduced overlapping even further. If, however, you feel that the track is too jagged at the edges, or you want a smoother track, by all means increase the value.
At this point I would begin cleaning up the design. Remember that when in-game you don’t want a wonky road or the corners to be too sharp. Enter edit mode and tweak the curves until everything is just about perfect (I would turn off the background while doing this). At this point it should look something like this:
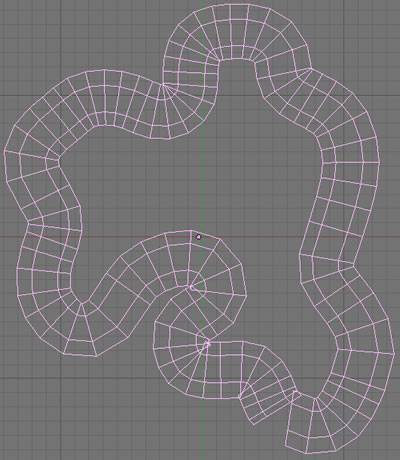
Adding elevation
Finally, now that the track design is done you can enter perspective mode and start to add some elevation. Before you can transform the curves in 3D space, you need to enable it. Just below the ‘DefResolU:’ field are three buttons, one of them labeled ‘3D’, select it and then you can begin.
You can switch to perspective mode by pressing ‘Num 5’. To add elevation, just enter edit mode, select the curve joint you want to change, press the ‘G’ key and then press ‘Z’ to move it vertically. You may not be able to make it out too well at this point, but here is what my track looks like with some elevation:

Modeling The Track – Part 2
Converting to mesh
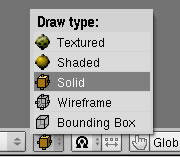
To start off we need to convert this track from curve to mesh form. Just as a backup or if anything goes horribly wrong – duplicate the track (SHIFT+D), scale the copy down and move it out of the way. To convert your curves, all you need to do is select the track, press ALT+C and select ‘Convert Curve to – Mesh’. Next, select the solid shading type in the 3D window header:
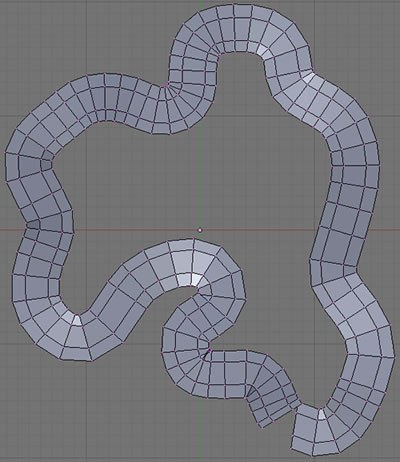
You should now see a grey shading of the track and when you switch to edit mode you will see a solid wireframe of the mesh:
Mesh cleaning
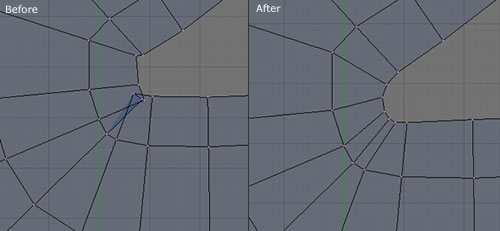
Now that the track is converted we can start to fix it up in a lot more detail. If you look carefully there are a lot of purple dots, these are the vertices of the mesh and for now we will be adjusting these. Zoom right into where you see a glitch in the track, such as overlapping. To fix it, select and move the vertices in that area until you are happy that it looks ok. If by any chance the vertices are hidden under the mesh (due to overlapping) you can switch to wireframe mode (Z) and you will be able to see all the ones behind. Below is an example of a quick ‘before and after’ of one of the corners:
Once you have finished cleaning up all the minor glitches I will show you how to close up the gap in the road. To do this you need to select the vertices/edges you want to close (either a tri or quad shape), and then press ‘F’. Once you have done that it may look a bit strange, again just fiddle about with the vertices until you are happy the shape blends in:
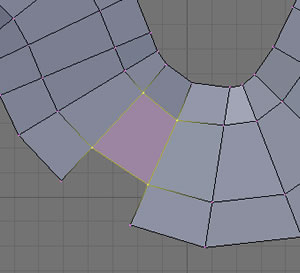
You can now use this technique to remove unnecessary polygons in the straight parts of the track. Just be careful not to remove too many around the elevation points. Select the vertices you wish to remove, press DELETE on your keyboard, then press ‘Erase – Vertices’ and join the two remaining sides:
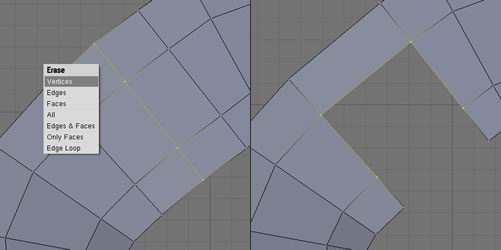
Next it is time to begin closing up the track to add a bit of ‘landmass’. There are several techniques for doing this, but I am going to show you the methods I use. This is probably the longest and most tedious job in track building, but it is worth it. To begin, start filling the smaller enclosures as they will only require single face filling. Again all you need to do is select the vertices you wish to close (3 or 4) and press ‘F’.
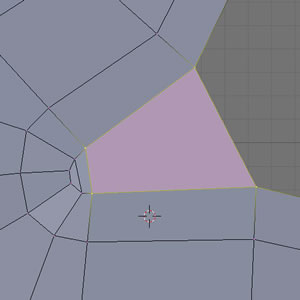
For the larger enclosures you need to use a special method which ‘splits’ the polygons for easy filling. First of all you need to select the vertices you wish to perform this method on (you can only do this to each enclosure individually) then press ‘E’. A popup should appear, select ‘Extrude – Only Edges’ and then press ‘S’ to size the extrusion inwards.
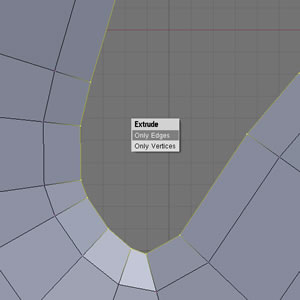
You will notice that the area around the extrusion looks ‘busy’ and difficult to close. We need to split the vertices into tris. Delete every second vertex and begin to fill the poly’s as shown below:
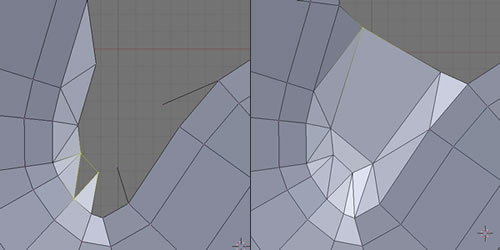
Another method of filling if a clean quad doesn’t fit is to fill triangles around a point. All you need to do is extrude a single vertex to the center of the extrusion area and begin to fill triangles around it, and it should end up like this:
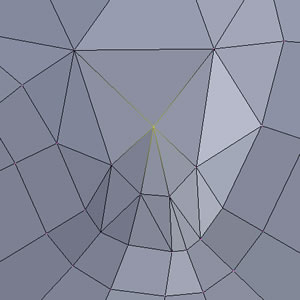
You can continue using the same method throughout the entire track – extruding, splitting and filling. Once you have finished, it should look something like:
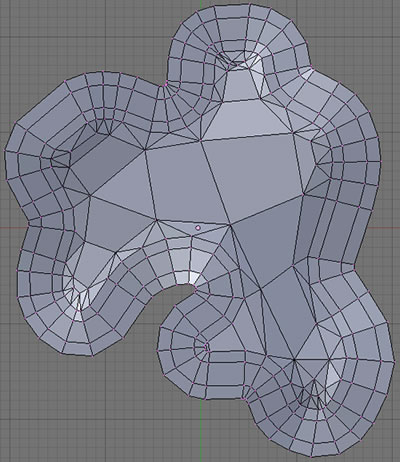
That took me around 30 minutes. It’s not the cleanest of modeling, but this is roughly what you should be aiming for. As you can see I have used the methods I discussed all the way around the track. It may take some time but eventually you will become faster and produce a much better poly flow. Practice makes perfect!
Finally as you may have gathered, the outside also needs closing. Again, use the same splitting method as mentioned previously, until you have extruded it outwards multiple times. Make sure you pull it outwards quite far and elevating higher each time – you don’t want to see over the edge of the track! Here is what my model looks like with a completed mesh. I used the splitting method multiple times when extruding outwards. Remember that the further away from the track, the lower the poly count:
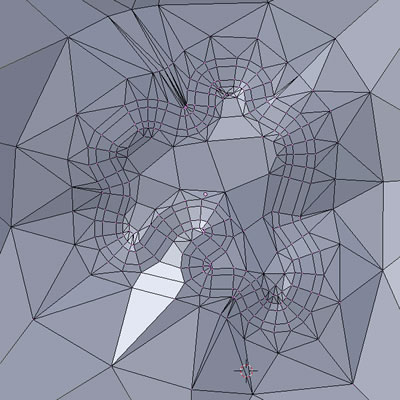
Texturing The Track
Gathering textures
Now, if you haven’t already, you need to decide what setting you are going to have your track in. A few examples include grass, sand, dirt, snow and city. My track will simply be a summer grass track, it’s probably the most appropriate to choose for a tutorial.
You need to now start to gather the textures. You could use Google with terms like ‘grass texture’ or ‘road texture’, but for seamless textures I recommend CG Textures (you can download about a dozen for free). There is also a way to convert standard textures to seamless as described here. If you don’t own Photoshop, then I suggest you try GIMP.
Hopefully you now have a decent collection of textures to work with. Move them to a folder called ‘textures’ in the same directory as your .blend file and name them appropriately (e.g. grass.jpg).
The texturing process
To begin, open up your track file. Change the ‘Draw type’ to ‘Textured’ – this will display any textures that are applied to the track. Now make sure you are in object mode, select the track object, then in the buttons window select ‘New’ next to ‘UV Texture’ in the Mesh box. Now make sure the “Draw type” is set to Textured. Enter edit mode with (‘TAB’).

We are now going to apply the road texture. Instead of having to select every individual face we can use a couple of shortcuts. In edit mode, hold ‘ALT’ and click the right mouse button on a part of the road. It should loop and select the entire path. If it doesn’t work, try moving the camera to different angles until it does. Here’s what it should look like when the entire road is selected:
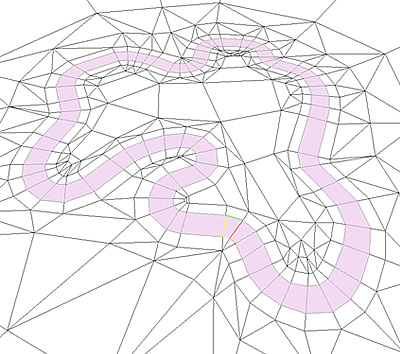
Now what we need to do is apply the road texture to those faces. On the separator between the button and 3D window, split the 3D area in half. Then click on the ‘Window Type’ button to the left of the new window header and select ‘UV/Image Editor’:
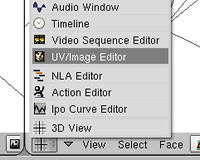
You should see the window appear grey with a blue square in the center. All we need to do for now is open the road texture, so select ‘Image > Open…’:

The open dialog should now appear. Select the road texture and click ‘Open Image’ in the top right. That’s it! You have now textured your road. Exit edit mode (‘TAB’) and take a look around. You will notice a slight glitch in the way Blender has laid out the texture; some of the road appears to be rotated the wrong way. To fix this, simply enter edit mode again (‘TAB’), select the face texture you wish to rotate, hit “Ctrl + F” and select “UV Rotate”. Note: The legacy menu in the image below is from Blender 2.40.
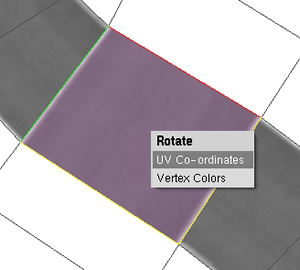
Usually for the road to flow seamlessly you have to rotate it three times, but it varies. Repeat the process for the rest of the wonky textures. For speed you can select multiple faces rotate them all at once.
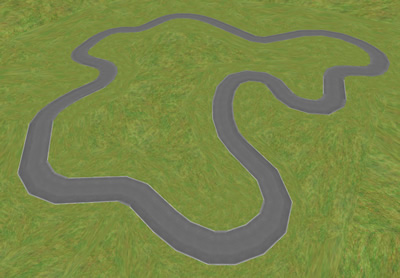
At the moment the track looks a bit plain and white. Basically the same process applies for any other texture you apply from now on. It’s now time to grow some grass. Instead of endlessly trying to select every face, there’s a useful shortcut you can use. Again, loop select the road in edit mode, then in the Editing window, in the ‘Mesh Tools 1’ box click on ‘ Select Swap’ and you should see the selection invert. Now you are ready to apply your grass texture – same process, make sure you are in normal face mode then: ‘Image > Open…’, select and voila. Hopefully your track is beginning to look like a track:
Final Touches
Adding a sky dome.
A sky dome for a track is obviously essential, and it’s not too hard to create either. You just need to worry about getting hold of the right textures. There are various resources on the internet for these, just Google “skydome textures”.
First of all you need to switch to top view (‘Numpad 7’). Then, move your cursor roughly to where you want the dome to appear (at the center of the track), and press ‘SPACE > Add > Mesh > Icosphere’. An icosphere is probably the best to use in this situation, you’ll know what I mean if you try using a UV Sphere.
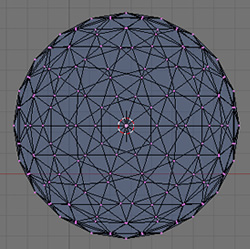
Now what we need to to is cut the sphere in half, so switch to front view (‘Numpad 1’), enter edit mode (‘TAB’) and preferably switch to orthographic mode (‘Numpad 5’). Next, press ‘Z’ twice, this will enter you into wireframe mode, which is useful for selecting behind vertices, then bring up the selection tool by pressing ‘B’ once. What you need to do now is drag a box around the bottom vertices and release to select them like so:
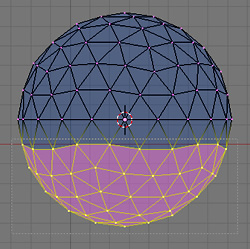
Obviously you now need to erase them for the dome shape to appear – press ‘DELETE’ then select ‘Erase – Vertices’. The sphere is now in dome form. Finally position and scale it appropriately, it needs to be very large in comparison to the track.
Now that the dome is in position and ready for texturing, add a new UV Texture in the Mesh box. The first thing that you will notice is that the ‘normals’ are facing the wrong way (outwards). The way the normals face depends on which side the texture appears – if you zoom into the track the sky dome appears transparent from inside. To fix this, select every face (‘A’). What you need to do now is press ‘W’ to bring up the ‘special’ menu . This contains the tool we need to use, so press ‘Specials – Flip Normals’ – the problem has now been fixed, enter face/object mode and zoom into the track to see what has happened. The sky is white!
Adding a texture to the sky dome is similar to what we talked about in the last section, but with a slight twist. Again, make sure you are in edit mode, split the screen and open the UV/Image Editor – this time though, make sure you are in front view (‘Numpad 1’). Select all the faces (‘A’) and then open up the sky texture you wish to use (‘Image > Open…’).
The twist is, that we need to use a different UV calculation. It looks a bit strange with the default setting. What we need is a continuous ‘wrap’. Make sure all of the faces are still selected and press ‘U’, then press ‘UV Calculation – Cylinder from View’. Yes, it does look even worse now, but what you need to do is scale down the texture ‘net’ so that it fits around the dome.
Drag the UV window further out so you have more room and then zoom out via either the scroll wheel or ‘Ctrl+MMB’ until you have a full view of the net. Then select the entire thing (‘A’) and scale it down vertically so press ‘S’ and then ‘Y’ and drag. It scales it down to the center, so just move it down to the texture by pressing ‘G’ and then ‘Y’ and moving your mouse. Zoom back in and try to scale it until it perfectly fits the box:

As you can see, the net is slightly wider than the texture, you need to do this due to the nature of the shape of the sphere. If you don’t then an ugly overlapping will form:

Hopefully you should now have your sky completed, take a look around – it really gives the track a boost in realism.
Lighting
Lighting isn’t too difficult in this situation, we are going to use a dynamic method that projects the sunlight directly onto the texture.
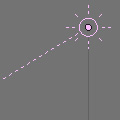
First off we need to actually add a source of light, namely the sun. Make sure the default ‘lamp’ setup is deleted then position the cursor around to where you want to place your sun. Press ‘SPACE’ to bring up the shortcut menu then go to ‘Add > Lamp > Sun’. You should see this element appear:
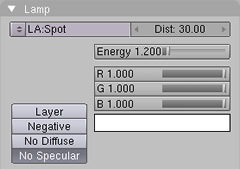
A couple of changes need to be applied to the sun’s properties in order for better results, and because I have chosen a ‘day’ track I need the energy of the light to be increased. I have used ‘1.200’ and enabled the ‘No Specular’ button (this stops the ground reflecting the sun):
Now we need to enable the track textures to allow lighting. To do this you simply switch to edit mode, select every face (or the ones you wish to support lighting), go to the editing buttons window and under ‘Texture face’ press the ‘Light’ button then ‘Copy’ next to Active Face Mode. ‘Copy’ duplicates the setting across all selected faces.
You should notice that shading has been applied to your track. To change the source direction rotate the sun (along the Z axis) and the shading direction changes.
Final result
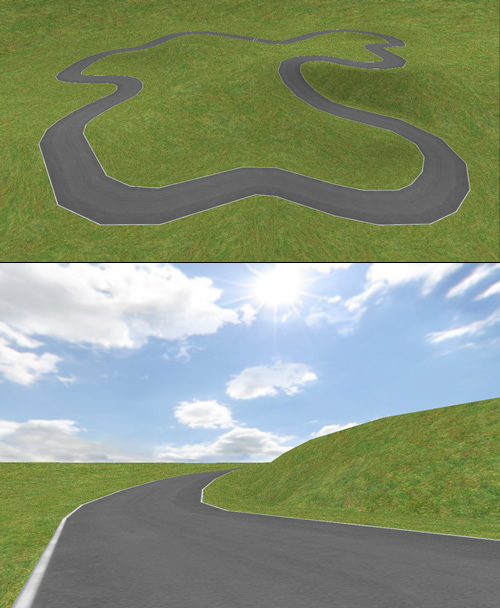
So, after all of that you’re probably eager to know what my track now looks like. First of all you should know that my poly count is around 950 faces which is extremely low and should run smoothly on most low-spec machines.
The shots below are all taken with MIP Mapping disabled. You can access the option by pulling down the ‘User Preferences’ bar, selecting ‘System & OpenGL’ then disabling the ‘MIP Mapping’ button. I won’t go into detail, but you’ll know what I mean when I say it improves realism for still shots. Take a look:
A Simple Test Engine
Adding The Required Objects
To start, we need to add the two elements that are needed for this to work; the camera and an ’empty’ object. Switch to the opposite side view (‘Ctrl+Numpad 3’), then orthographic mode (‘Numpad 5′) and place the 3D cursor to the side of the track. You then need to add an ’empty’ object, so, press ‘SPACE > Add > Empty’ then ‘Alt+R’ to clear/reset the rotation. You can always zoom in if the object is too small to see. This ’empty’ will be used as the controller for movement and physics.
For the camera – press ‘SPACE > Add > Camera’ and again clear the rotation (‘Alt+R’). Then rotate it along the ‘X’ axis, preferably so it’s tilted slightly downwards to the right. Finally, move it upwards about 1/3 of the way along the ‘Z’ axis. Your objects should now be in the following arrangement:
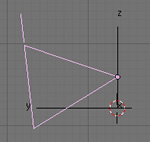
What we need to do now is ‘attach’ or ‘parent’ both of these objects to each other. Make sure you have the camera selected first (this is important) and then select the ’empty’ and press ‘Ctrl+P’ (‘OK? – Make parent’). Both the objects should now attached in the correct manner.
Enabling Physics
Of course these objects won’t do anything unless we apply some physics. Select the ’empty’ and in the buttons window switch to ‘Logic’ (F4). This is where we will be applying all the dynamic stuff for our engine.
For now, select the ‘Actor’ button in the top right and then ‘Dynamic’. You should see a range of settings appear. Change them to the following values:

These values are, from experience, the best to use for what we are trying to achieve. The ‘Mass’ affects the acceleration speed of an object, the ‘Size’ is the size of the collision bounds of the object, the ‘Damp’ or ‘Dampening’ acts against movement (like air resistance), and the ‘RotDamp’ or ‘Rotational Dampening’ affects the rotational speed.
You’re probably pretty eager to find out what these settings have done. Unfortunately it won’t do too much at the minute, but it’s best to check everything is working as it should. Select the empty object and move it fairly high above the track (the camera will follow), then set that camera as the default (select it then press ‘Ctrl + Numpad 0). Now press ‘P’. You should see your camera fall and stick to the the ground. If it does that then that means everything is working, if not then I would either check your physics settings or check the parenting.
Material And Camera Settings
I think you’ll agree – it’s not overly exiting when it just ‘sticks’ to the ground like that; I prefer to have no friction just for the fun of it, so you can slide down the sloped areas easily. To do this, we need to change the track’s material settings.
Select the track and switch to the materials or ‘Shading’ buttons (‘F5’). Within this, enable the ‘DYN’ button to reveal a few extra settings for physics. For the result we are trying to achieve, we want it to be slightly bouncy and very slippy, so, set the friction to ‘0’ and the ‘Restitut’ to ‘0.3’:
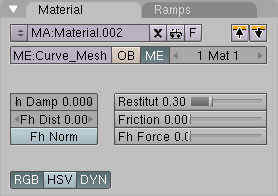
Now play the game (‘P’). You should notice your camera fall, bounce a little, then slide down the track. We’re getting there…
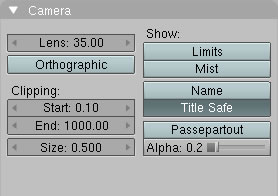
Depending on the scale of your track or skydome, you will probably notice a restriction to how far the 3D is displayed. This is because of camera ‘clipping’. For the engine to run faster the game engine clips off a certain distance from the camera, which doesn’t look too good. To fix this, simply switch to the ‘Editing’ buttons (‘F9’) and change the ‘End’ value to something like ‘1000’ to be safe, but again this depends upon the scale of your track. This will push the clipping distance further away so that the view is extended.
Adding Control
Now for the most exciting part of this tutorial – adding interactive functionality. The process is actually easier than you think, especially with Blender’s Game Engine. In this situation we will be using a system called ‘Logic Bricks’; These allow you to apply simple actions and functionality quickly and easily without the need of any programming.
To get started, switch back to the Logic buttons window (‘F4’). If you take a look to the right of the physics properties, you will see three columns of buttons – this is what we will be using. These are, in order: ‘Sensors’, ‘Controllers’ and ‘Actuators’.
We are going to be applying the functionality to our ’empty’ object as mentioned earlier, so, select it and then where it says ‘Add’, click this button under all of the three columns. It should now look like this:

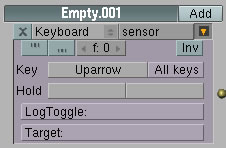
First of all we will add a forward thrust to our object which will trigger when we press a button on the keyboard, I will be using the ‘up’ arrow. In the sensors column, bring down the menu list where it says ‘Always’ and select ‘Keyboard’. To specify the button which you wish to use, press the grey bar to the left of where it says ‘Key’ and press the desired key. You should end up with this:
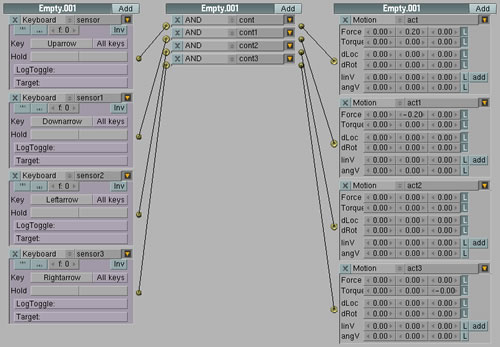
In this case we don’t need to worry about the next column, so just leave that as it is for now. Moving onto the third and final column, fortunately it’s at the settings that we need to use, this is where we specify the forces or movement which is applied to our object. We will be using ‘Force’, and the different value boxes are in the order of X, Y and Z. We have the camera facing along the Y axis, so we need to change the middle box. Set the value to around 0.2, this should be about the right setting to use, not too fast and not too slow.
In order to get these to work we need to join them up, so if you think about the columns logically, it should process as ‘Keyboard’ ‘AND’ ‘Motion’ – so when you press the button you specified, it applies the motion. What you need to do is drag your mouse from the gold ball points to the gold holes and a line should automatically snap to each brick. Like so:

If you need to remove an attachment, hover over the line you wish to remove and press ‘X’. You can now test to see if it all works. If you press and hold the button you specified in the bricks you should see your camera thrust forward. Obviously you can always adjust the speed in which it does this in the motion box.
To finish off with keyboard control, add three more logic bricks to each column (for the down, left and right keys) and join them all up. With the down arrow, it’s pretty much the same as the up but with a negative thrust value e.g. ‘-0.2’.
For left and right movement we need to rotate the camera, again, the same procedures as with the up arrow, but this time instead of entering the values in the ‘Force’ row we need to enter values in the ‘Torque’ row. Torque is force rotation, it’s a bit like a spinning top, you apply the spinning force in order for it to turn and gradually the turning momentum decreases. So, again the same principles but this time you need to remember that you are turning along the ‘Z’ axis which means you need to enter your values in the last column. A positive for left turning and a value negative value for right turning, both ‘0.003’.
Now, if you test it, you will be able to move forward, backwards and turn left and right. The logic bricks should look something like this:
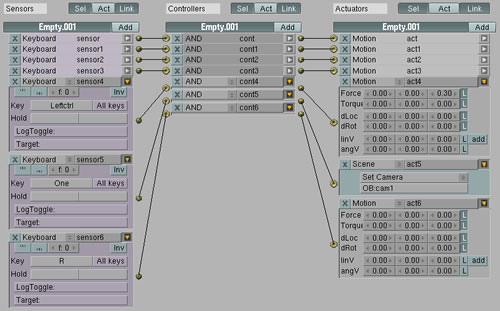
There are also three other bricks I like to add; a fly button, a camera button and a scene reset button. Before you do that, you might like to collapse the current bricks so you have more room, all you need to do is press the small orange down arrow button on the top right of each of them. Once you’ve done that, again, add three more logic bricks to each column and join them up. The first still only need to be set as keyboard sensors, and the second still remains as ‘AND’. The bricks we will be changing are the ‘actuators’.
If we choose the order of ‘flying’, ‘camera’ and ‘scene resetting’ you can define the keys to be pressed to trigger these events. I will be using ‘Ctrl’, ‘1’ and ‘R’. Now take a look at the actuators, the first we will be modifying is the flying. All you need to do is think about force and ‘Z’ thrusting, so leave it as ‘Motion’ and apply a value of ‘0.3’ to the top right field. If you test it out, you will see that if you press the key you specified, you can fly around your track.
The next we move onto is the camera. For example, if you can’t be bothered to switch to that camera every time you want to test it out, when you play it, press the button you assigned and it will automatically change to that camera. Press the drop-down list where it says ‘Motion’ and select ‘Scene’, another drop-down list will display. Press it, and select ‘Set Camera’. What you need to do now is assign a name to your camera e.g. ‘cam1’. To do that, select the camera, switch to the ‘Editing’ settings and then enter a name into the field where it says ‘OB:’, remember it is also case sensitive. Switch back to your ’empty’ and enter that name into again, where it says ‘OB:’. If you test it now, you will see that the button you specified will automatically switch to that camera.
Last but not least, for the scene resetting, all you need to do is bring down the list again where it says ‘Motion’ and select scene. It is already set to ‘reset’ so it should work ok. Again, test it out, you can use this for example if you fall off the track. Here’s a final screen of what your logic bricks should look like:
Conclusion
Phew! Despite the length, I hope you have enjoyed this tutorial in a way and gained something from it. If you managed to follow it this far, I’d love to hear your feedback – did it help? How difficult did you find it? How could it be improved? Better still I would be very interested to see your end result (maybe some screenshots?), and possibly, with your permission, I may even publish it on the website. Feel free to use the comments box below.

Hi Daniel, Thanks for your racetrack tutorial. It was realy help me. But can you please tell me how to scale the track? I also need a 620m by 10m track, and I got a very big track at the final result. And also, how to export the result to 3ds max keeping all textures, shapes ….? Again thank you. Jose
I can’t change the size of my objects in the logic box. i also caan’t add a material without the game making it go white. therefore I find it hard to make collisions, and it some times cause my ‘car’ to go through the mesh. please tell me how to fix it.
Hello, Daniel!
Thank you for providing this tutorial. I found it while looking for free-to-use racetrack models-this shows me how to create my own. This will also help me get my feet wet with Blender 2.64.
Great tutorial man, thks